Table of Contents
fsi Local Develop Environment
Introduction
This project enables you to create a local development environment for fsi mostly automatic. The environment consists of the following modules:
- VM with fsi server
- Windows management VM
- Empty VM's to test installation with fsi (optional)
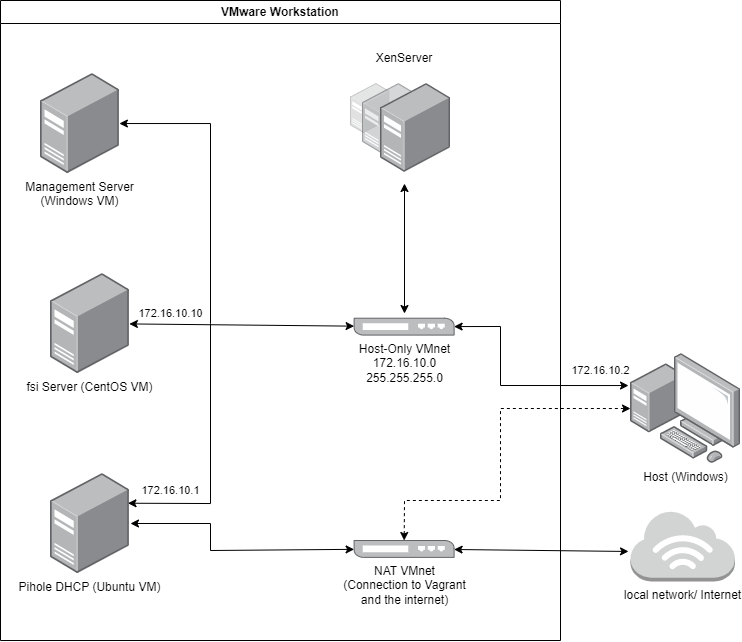
The network architecture looks as follows:
Networks
Host-Only VMnet:
- Private Network between virtual machines and host
- No connection to the internet
- Ubuntu VM runs DHCP via Pihole
NAT VMnet:
- Created by vagrant itself to communicate with the VM
- Access to the internet
The project is located on gitlab: https://gitsrv.schnuerle.com:8443/fsi/fsi-locdevenv
Download the whole repository. To do so use the download option in the top right or clone the repository via git.
This project is still being developed. You might run into errors. If this is the case please create issues within gitlab.
Installation
The building of the fsi development environment is divided into 5 steps:
1. Prepare Host
In this step the programs needed for the local development environment are installed on the host machine. Those are:
- VMware Workstation: The later on created virtual machines (VM) can be managed and used in the workstation. You can hand over a license key with the parameter -k if you have one. Otherwise you can still insert the key in the GUI when starting the Workstation or you can use the free trial.
- Vagrant: Vagrant is a software that enables the automatic creation of VM's.
- Vagrant Manager: This is a program that makes it easy to manage VM's from the status bar.
- Vagrant VMware Utility: This Vagrant add-on is needed to use vagrant in the VMware workstation.
2. Create Pi-Hole VM
An VM with ubuntu as operating system is created with the help of vagrant. After the creation Pi-Hole is installed and configured. The password for Pi-Hole is defined with a parameter that is given at the execution of the script.
3. Create fsi VM
A VM that operates as the fsi server is created with a specific fsi iso file and the vmx toolkit.
4. Create Windows VM
A Windows VM is created that operates as a management VM. It has putty and XenCenter installed.
5. Create Test VM's
That script creates three empty VM's with the help of the vmx toolkit. You can see the mac addresses in the script. This VM's can be used to text an installation with the fsi server.
